- Price
- Completeness of Directions
- Completeness of parts/materials
- Ease of Installation
- Final Product
So for my first scoring on the KC HiLites Cyclone 4 Piece Rock Light Kit:
- Price - 1 ($226.99)
- Completeness of Directions - 3
- Completeness of parts/materials - 3
- Ease of Installation - 3
- Final Product - 3
Grand total of a 13 for this kit! Now let's get into the install... I want to point out that the install is for a Jeep with standard Rubi Rails from the factory or steps. My Rock Slide Engineering steps that I installed last week were a bit different from a mounting perspective so I needed to grind down part of the step mount that is not normally present on the factory steps. I did not count this as an issue for the light install.
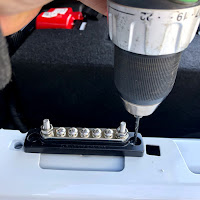
Step 1: Install the Busbar - I like Busbars as they make for a nice clean install and allow for me to easily upgrade to additional lights in the future. It is a four inch bar that you mount relatively close to the battery and a common ground. I mounted mine close to the battery but up out of the way (see picture for details).
Step 2: Installation of the 4 Cyclone Rock Lights - In the directions it tells you to mount them to the hardware for the Rubi Rails but as you are aware, I have already replaced those and I mounted them in a slightly different spot using the brackets that KC provided with the lights.
Step 3: Driver Side Wiring Harness - This is a straightforward run from the Busbar, across the firewall and down to the frame rail on the driver side. I used zip ties to secure it along the way and connected the Cyclone lights to the wiring harness using the supplied bullet connectors. KC nicely added in extensions that you can use if you need a little extra length to get from the light mount over to the wiring harness. I had to on the driver side as I needed about 2 additional inches and it worked out fine.
Step 4: Passenger Side Wiring Harness - This is the same deal as the Driver side only running down the passenger side of the vehicle to your Cyclone Lights. Only really important item to remember here is to make sure you zip tie the harness up and out of the way from anything that might snag it off-road or and heat source that could melt it. I did not need to extend the wires on the passenger side as there was ample wire in the harness itself.
 Step 5: Switch Harness Installation - This is where I deviated from the KC provided install instructions. Since I wanted to use one of the Auxiliary switches already installed in my JL, I took a look at the following detail from the owners manual and located the wires near the battery under the hood. I utilized the Dark Blue/Pink wire which has a 15 amp fuse for my power source (this is the Aux 4 Switch). I extended and ran this wire to the Busbar where the instructions called for the Green Wire from the KC wiring Harness to go. Since this is already a fused switch, I did not need to do anything else.
The Journey is what counts, Adventure Awaits!


This install is pretty cool. Saw it in the parking lot and it looks great. Congrats.
ReplyDelete@jerseypatel - Thanks and I appreciate all the information you gave Giselle
ReplyDelete